Saturday, June 10, 2017

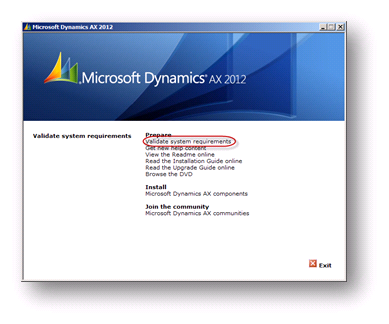
Enterprise Portal With SharePoint 2013 Installation & Configuration For Microsoft Dynamics AX 2012 R2


Before installing the enterprise portal, we have to check compatibility of the system, and install valid prerequisite before which is essential for the Dynamics Ax 2012 R2 Enterprise Portal.

Let’s start inspection of system requirements.

  • Open the Microsoft Dynamics AX 2012 R2 setup.
  • Click on “validate system requirements” option.

  • Check the “Enterprise Portal” checkbox from the list of components and then click on validate button.
  • Install the Pre-requisite listed below in the result.

     
The essential prerequisite for Enterprise Portal is SharePoint Foundation/Server. Here I am installing SharePoint 2013 Foundation. 

  • Download the following Prerequisites & install it manually:
  • sqlncli.msi
  • Windows6.1-KB2506143-x64.msu
  • dotNetFx45_Full_x86_x64.exe
  • Windows6.1-KB974405-x64.msu
  • Synchronization.msi
  • MicrosoftIdentityExtensions-64.msi
  • setup_msipc_x64.msi
  • WcfDataServices.exe

  • Install software prerequisites from the setup of SharePoint Foundation 2013, it will configure “Application server and Web IIS” after that it will automatically install the Windows Server AppFabric and its updates...

     
  • If after installation, the AppFabric server installation shows any error then do as follows…
My computer \ Properties \ System \ Advanced System Settings \ Environment Variables \ System Variables
PSModulePath - C:\Windows\system32\WindowsPowerShell\v1.0\Modules\;c:\Program Files\AppFabric 1.1 for Windows Server\PowershellModules
  • Once the installation will be finished, it will automatically open the SharePoint Products Configuration Wizard, cancel the product configuration wizard and then install “KB2768000” update for SharePoint 2013.  

    After that you can start the SharePoint product configuration wizard, you can start it from
Start > All Programs > Microsoft SharePoint 2013 Products > SharePoint 2013 Products Configuration Wizard
  • Select the new server farm for SharePoint, which is creating a new server farm in the system and then add our server into the new server farm, or else you can connect with any existing server farm by using the passphrase of that server farm.

     
  • Specify your database server name, Username and Password
     
  • Specify your custom port number or you can use the system generated port number as well, choose NTLM as an authentication provider

     
  • It gives summary of the configuration settings, which will be applied, click on the NEXT button and it will start the configuration process
  
  • It will take a little long time to configure the SharePoint product

  • Specify the farm security passphrase, which is used when you want connect another server with this farm
     
  • Hit the FINISH button and SP 2013 will be configured  

  • It will create a new “Config” database, “Admin content” database & other required databases in SQL server for SharePoint like below image. 


After clicking on finish, it will open the configuration wizard in your default browser.

  • Before the configuration of product in the IIS manager, the default SharePoint 80 site is not exist, refer below image
  • Now START the wizard in the browser, which is open after FINISH the product configuration wizard
  • Specify existing or create new management account and do NEXT
  • Specify the title & description of your team site or you can also skip the below step & click on OK button
  • Do FINISH the wizard


  • Now you can see the default SharePoint 80 site on the IIS manage after completing all the configuration wizards. The configuration wizard that helps you to create & configure SharePoint 80.
  • SharePoint 80 site would appear as such below in the browser  
After that open the SharePoint central admin

  • Open manage service on order
  • In that find claims to windows token service, if it is in stop status then start it.
  • After that restart the PC.

Install the EP from 2012 R2 setup.

  • Open the setup of Microsoft Dynamics AX 2012 R2

     
  • Select Add or Modify Component
  • Select Enterprise Portal from component list & do NEXT

     
  • After validation on requirement click NEXT

     
  • Specify a user name and a password for the business connector

        
  • It will use the default SharePoint 80 to create the Enterprise Portal site for Dynamics AX
  
  • Again it will validate the requirement for the Enterprise Portal, Once that finishes do NEXT

     
  • Now click on the Install button and it will start installing the Enterprise Portal for Microsoft Dynamics AX 2012 R2

       
    The installation may take some time

        
  • Finish the installation

Your installation of Enterprise portal with SharePoint 2013 is installed successfully in your system, Now you have to do is assign proper ROLE to the user and setting up the ROLE CENTER the that USER. Other side you can open your Enterprise portal site on the browser with valid credentials

Cheers…

List of table in AX 2012 should be backuped while restoring the database

List of table in AX 2012 should be taken backup while restoring the database

Table Names:


For DMF setting export DMFParameters this table as well.

How to restore the DB Form Source to 

Destination in Microsoft Dynamics AX 2012 R3


Objective: Main Objective is to save the system tables/settings

Like EP, BI, SSRS, User Info and Etc…


Step 1: Open Source Environment Database via SSMS

Step 2: Create a Local folder to store the DB files

Step 3: Backup Source Environment Database

  • ·         Stop AOS (Backup can also be taken without stopping the AOS)
  • ·         Perform full database backup via SQL

Step 4: Backup Destination Environment Database

  • ·         Stop AOS (Backup can also be taken without stopping the AOS)
  • ·         Perform full database backup via SQL

Step 5: Backup System Configuration Tables in the destination environment


Select the database MicrosoftDynamicsAX

Select > Tasks > Export data


Follow this:


Select the Server Name here in our case LocalServer


 Choose Destination Database (create new database) click New>


Type database name and click OK. 

This database will contain the backup of the tables which are needed to be backed up for the destination environment.


Click OK>

Click Next>


Click Next>


Select all the tables needed> Use Page down Key from your keyboard.


Select all the system tables from the list below and then click Next>


Full list of system tables for AX2012 R3 (include or exclude user-related tables – marked as Optional – depending on whether you want to keep the user setup or not):


Click Next and Finish


Note: 11 Total may not be as per your need.


Step 6: Restore source database backup to the destination database

Database restore from a backup (WITH REPLACE)
Note: ensure data and log file names are correct.

Step 7: Import data from the new database created in Step 5


Select the database MicrosoftDynamicsAX and click Tasks > Import data


Select the Server Name as LocalServer.


Select System Parameter form the Database Drop down and click Next>


Choose destination (select destination environment database) and click Next>


Click Next>


Just Check the Database Name is correct or not.


Next>


Select the Tables from top> all will be selected automatically>


Select Edit Mappings> Check Delete option> Click Ok.


Click Next> Next> Finish!

Click Close

Step 8: Start and synchronise

·         Start the AOS

·         Open the AOT Synchronise dictionary in the destination environment.


Happy DAX Infra!